
DIY Fall Pillow with Pumpkin Applique Pillow Wrap
Sew a cute DIY fall pillow cover with a removable pumpkin applique pillow wrap! It's easy with my free pattern and tutorial.
This post contains affiliate links. If you purchase something through one of those links, you won’t pay a penny more, but I’ll earn a small commission which will help me keep bringing great content to you. Thanks!
I love decorating for fall! It’s always fun to start putting out the earthy, cozy décor after a summer of hot and muggy. This year I made a new pillow to add to my fall décor, and I’ve got a free pattern for you below.

I actually made it in two pieces – a plain pillow cover and a decorative pillow wrap. Together they make a cute fall pillow design! The idea is that I can use the one plain pillow all year and just switch out the wraps as the seasons change.
*HINT* I’ll be bringing you more pillow wrap patterns in the coming months for other holidays and seasons. I'm pretty excited about this! I've made a snowman pillow wrap already - you can get the pattern here.

When I say the base pillow cover is plain, I’m not exaggerating. I just used a natural canvas or duck cloth with no trim, no nothing. The design details are all in the wrap, and I’m loving how it turned out!

The wrap closure is just a strip of hook and loop tape. Doesn't get much easier than that!

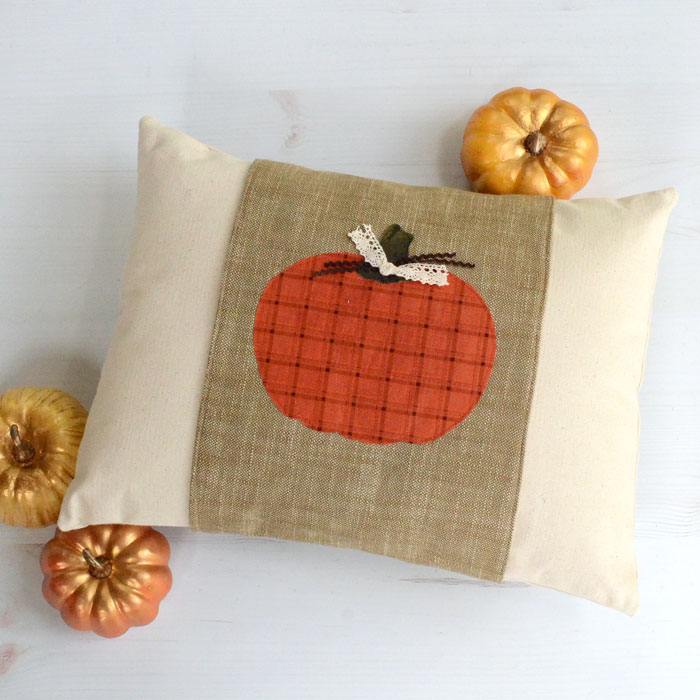
The pumpkin applique design is pretty simple – just two shapes then some ribbon to embellish the stem! I dug through my scraps to find the perfect fabrics for the pumpkin.

The wrap is made from a Moda boro slub canvas that has the richest texture and the softest feel! I bought it at my local quilt store, and I’m thinking I may have to go back and buy a few yards more while they still have it.
Though I love love love that boro slub canvas, you can actually use any home dec weight fabric or quilting cotton for the wrap.
If you use a fabric that likes to fray, you might want to increase the seam allowance. My tutorial uses 1/4” seam allowance on the wrap, which is pretty narrow. But it allowed me to squeak the wrap out of a half-yard of fabric. If you decide to do a larger seam allowance, just add ½” to the length and width of the pillow wrap and interfacing to account for the larger seam allowance.
Finished dimensions for the fall pillow are approximately 12" x 16". You can find this size pillow form pretty inexpensively and it's the perfect proportions to place at the back of a chair or bench. How's that for easy decorating?

I actually use this pillow size a lot, like in my Boho bleach denim pillows for my front porch and, more recently, in the shibori bleach dyed pillow I made for my daughter.
DIY Fall Pillow and Pumpkin Applique Pillow Wrap
Supplies
Pillow Front – 1 piece 17” wide x 13” tall from canvas or duck cloth
Pillow Back – 2 pieces 11.5” wide x 13” tall from canvas or duck cloth
Wrap –2 pieces, 9” wide x 28” long from quilting cotton or home dec fabric
Lightweight fusible interfacing – 1 piece 8.5” wide x 27.5” long
Hook and loop tape –1 piece, 8” long
Pumpkin applique – fabric scraps to make pumpkin and stem
Fusible webbing
Free pattern – Pumpkin Applique Pillow Wrap

Prep your pieces
Trace the Pumpkin and Stem patterns reversed on to the paper backing of the fusible webbing. (The pattern is already reversed for you.) Follow manufacturer’s instructions to fuse the webbing to the back of your Pumpkin and Stem fabrics, then cut out the shapes.
Follow manufacturer’s instructions to fuse the interfacing to the back of one of your Wrap pieces. This will be the Wrap Front. (The piece without the interfacing will be the Wrap Lining.)
Sew the pillow
Take one of the pillow back pieces and fold one 13” side ½” to the back and press. Fold another ½” over and press again. Stitch close to the folded edge to create a double fold hem. Repeat with the second pillow back piece.

Place the pillow back pieces on the pillow front, right sides together and raw edges aligned. There will be a section in the middle where the back pieces overlap. That is good. We want that to happen.

Sew around all 4 sides with a ½” seam allowance.
Clip corners and turn right side out. Insert pillow form through the overlap in the back of the pillow cover.
Create the pumpkin design
Center the Pumpkin applique shape vertically and horizontally on the Pillow Wrap Front. Follow manufacturer’s instructions to fuse the shape down, then top stitch around the shape close to the edge to secure.

Place the Stem on top of the Pumpkin, with the bottom of the Stem about ½” from the top of the Pumpkin. Fuse the shape down, then topstitch around the shape close to the edge to secure.

Sew the Wrap
Place the Wrap Front and Wrap Lining pieces RST (right sides together). Stitch around all 4 sides with a ¼” seam allowance, leaving 3.5” open along one of the short ends to turn it right side out.

Clip corners. Turn right side out, then give it a good press. When you get to the turning hole, press the raw edges to the inside in order to create a smooth edge.
Top stitch around all 4 sides with 1/8” seam allowance. This will close the turning hole.

Now for the hook and loop tape. Sew the “hook” side (that’s the scratchy side) of the tape across the top of the Wrap Lining (the back of the wrap), centered horizontally and about ½” from the top edge. Stitch around all 4 sides of the hook tape so it’s good and secure.

The last thing to do is sew the “loop” side (that’s the soft, fuzzy side) of the tape to the bottom of the Wrap Front.
You’ll need to place the Wrap around the Pillow so you can see how far up from the bottom it needs to be in order to connect with the hook tape. I placed my loop tape about 1.5” from the bottom of the wrap, but it may be different for you depending on how fully your pillow stuffed.

As before, stitch around all 4 sides of the tape to secure it.
Your wrap is finished! Place it around your pillow for some cute fall décor!

7 comments
Comments are closed.
What a brilliant idea, I love the idea of changing your decor seasonally in such a simple way.
Ingenious! This wrap idea is one of the best hacks for pillows - you can make them all and just switch and rotate between seasons. I love it!
What a great idea!! I never thought about wrapping a pillow. And that pumpkin is SO cute.