
Duct Tape Pencil Pouch for Happy Planner - DIY Tutorial
Create a pencil pouch for your Happy Planner system with this DIY tutorial! I'll show you how to make an easy duct tape pencil pouch that fits in a Happy Planner!
This post contains affiliate links. If you purchase something through one of those links, you won’t pay a penny more, but I’ll earn a small commission which will help me keep bringing great content to you. Thanks!
I’ve been using a Happy Planner system for a couple of years now. The layout of their planner pages works for my crazy schedule, working part-time out of the house and part-time from home as a blogger. Oh, and also being a Girl Scout leader, Sunday school teacher, and parent of a very busy teenager. The flexibility of the Happy Planner system works for me, plus they’ve got all kinds of cute add-on pages and accessories to customize it to my needs.
But do you know what I didn’t have?
A pencil pouch. I’ve got a cute stick-on pen holder attached to the front cover but it holds only one pen. I like to use a variety of pens – not to mention sticky notes, paper clips, and other goodies – when writing in my planner. But I had no easy way to store them with my planner.
So I decided to make my own pencil pouch for my Happy Planner. The pencil pouch part is super easy to make from duct tape, and there are all kinds of colors and patterns of tape to choose from. The challenge was how to make it work with a disc binding system.
I figured out an easy solution and I’ve got a tutorial for making a Happy Planner duct tape pencil pouch for you.

It turns out the solution is a very inexpensive school supply. A plastic folder! And during back-to-school time there are lots of colors to choose from and you can pick them up for about 50 cents each.
The disc binding holes problem solved, the actual making of a Happy Planner duct tape pencil pouch is really quite simple. And fun, too! I’ve got a tutorial for you below.
Do you know any teens working on a large scale service project? These are the custom planner pages I created to help keep a large project on track.

Before we begin, there are a couple of things to note:
The supplies and measurements in the tutorial are for the largest size Happy Planner, the one that takes 8 ½” x 11” paper. You could make a smaller pouch for the smaller planners, but you’d need to adjust the supplies and measurements for that. Also, keep in mind that a smaller pencil pouch may not be long enough to hold a freshly sharpened pencil.
And while my tutorial shows how to make a pencil pouch for a Happy Planner, you can also easily adapt it to make it fit in a standard 3-ring binder. Just use a 3-ring binder punch instead of the Happy Planner Page Punch and it’ll go in a regular binder.

Supplies
Gallon size plastic bag with slider top. The top of the baggie and the slider will show in your finished pouch, so take that into consideration when choosing your baggie. My prototype was made with the same rose duct tape you see in these photos, but my baggies had a royal blue top which looked really yucky. I went to another store and found the magenta tops that looked much better.
Also, there are now gallon sized baggies with nice gusseted sides to give them a wide bottom that will hold more food. That’s great if you want your baggie to hold more food, but for this project those gussets will be a mess on the inside of your pouch. Make sure you buy gallon baggies with straight, non-gusseted sides.
Duct tape. You’ll need roughly 1/3 roll of duct tape to make one pouch.
Plastic folder. It doesn’t really matter what kind, so long as it’s made from thin plastic. We’re going to cut it up and punch it, so it needs to be kind of thin. Don’t get the durable thicker plastic folders – just get the cheap ones. I used these inexpensive plastic folders from Target.
Happy Planner Punch (Big). This is actually optional but it makes the project so much easier! It’s kind of pricey so I don’t know that I’d buy it just for this project, but it’s nice to have if you like to add things to your planner. I use a lot of custom planner pages so I already had it to punch my pages to add to my binder. If you don’t have the punch, you can make do with a hand-held hole punch.
Scissors
So now that you’ve got your supplies, let’s make a duct tape pencil pouch for your Happy Planner!
How to make a duct tape pencil pouch for a Happy Planner
First, cut a rectangle from your folder that’s the width of your plastic baggie x 2.5” tall.
Punch the plastic with your Happy Planner Punch (Big). Your plastic will probably be slightly shorter than a letter-sized sheet of paper so you’ll need to center it vertically in the punch.
If you don’t have a Happy Planner Punch you can use a page from your planner as a template. Mark the holes on the plastic and then use a hand-held punch and a pair of scissors to punch the circles and cut the notches.

In the photo above, the black piece is punched with the Happy Planner Punch. The gray shows what it would look like if you punched it with a 3-hole punch to go in a standard binder.
Cut 5” off the bottom of the plastic baggie. The baggie should now be roughly 6” from the top to the cut edge.

Let’s go ahead and close up that open bottom of the baggie. Place a length of tape across the bottom of the baggie, with roughly 1.5” extra on each end and with some of the tape hanging off the bottom so you’ll be able to wrap it around. (Photo shows the baggie turned over so you can see how extra to leave on the ends and across the bottom.)

Cut slits from the sides to the edge of the baggie.

Wrap the top side pieces around the edge of the baggie.

Next, wrap the bottom up over the cut edge of the baggie.

Finally, wrap the bottom side pieces around the edge of the baggie. Now the bottom is closed. If your corners aren’t super neat, don’t worry. We’re going to cover all of this with another layer of tape.

Now, place the bag on the punched plastic piece, with the bottom of the baggie 1.5” from the punched edge of the plastic piece. Use a couple of small pieces of duct tape to hold it in place, while being careful that the tape doesn’t extend more than ¼” past the edge of the baggie.

Place a piece of duct tape across the bottom, 1” from punched edge of plastic piece, covering up those small pieces of tape.

Wrap edges to the back of baggie.

Turn baggie over, and repeat on the back.

Use the same process to continue covering up the baggie, overlapping the strips of duct tape as you work up to the top of the baggie.

At the top, place your final strips of duct tape so they come just below the slider. Make sure the tape doesn’t interfere with moving the slider.

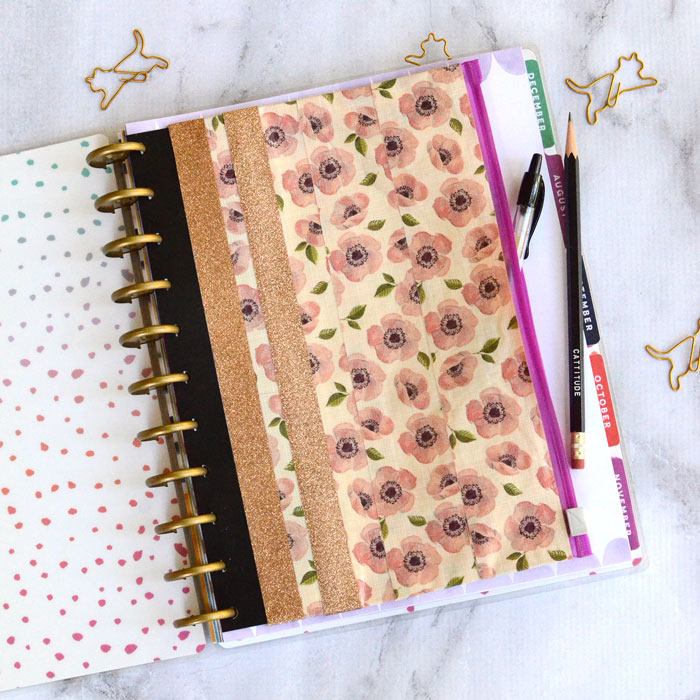
You’re done! Embellish as desired.
I added a couple of strips of glittery tape from a mini roll of duct tape.
I mentioned at the beginning of the post that you can also make a duct tape pencil pouch for a 3-ring binder. Here is the finished 3-ring binder pencil pouch I made.
It looks mostly the same, just different embellishment and of course different holes punched.
