

Summer Bucket Hat Tutorial And Free Sewing Pattern
Sew a bucket hat to keep the sun off your face when you’re out on summer adventures! Use my bucket hat tutorial and free sewing pattern to whip one up in an afternoon.
I love being outside, but my skin burns easily. Luckily this year I’ve got a pretty new bucket hat that will protect my face from the fierce summer sun. I couldn’t find one exactly how I like in the stores, but that’s okay because I can sew and so I made one for myself. I’m kind of in love with it.
I’ve got an easy bucket hat tutorial and free sewing pattern so you can use to make one for yourself.

Bucket hats are actually quite easy to sew. I’d say this is a confident beginner project. The bucket hat tutorial steps are simple but they do require sewing some curves. If you can sew curves, you can make this hat. (And if you’re not good at sewing curves, this hat might be just the project to help you practice them!)
For more summer sewing inspiration, check out my round-up of fun summer sewing projects you can make in an afternoon!
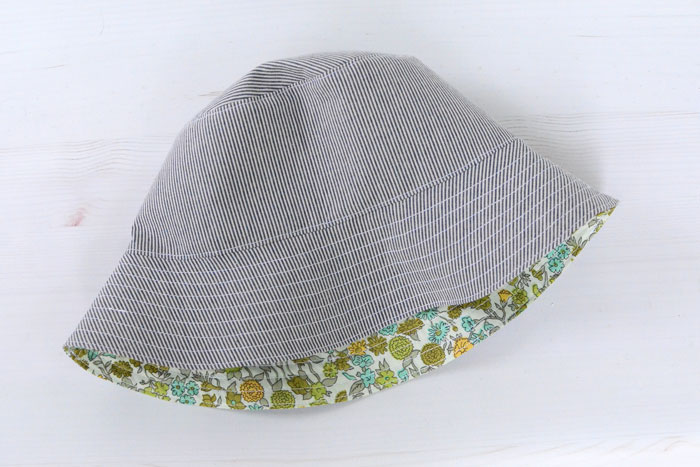
The bucket hat tutorial doesn’t require any special materials. In fact, if you’ve got a healthy fabric stash you probably have everything you need on hand. All you need is fabric and interfacing. I used the tail end of a lightweight railroad stripe denim (left over from this door hanger I made for my mother) for the outside of my hat, and a vintage ditzy floral for the lining. I’ve been hanging on to that vintage print for years waiting for just the right project!

The free pattern fits a medium-to-large sized head, which should fit most everyone out there.

Summer Bucket Hat Tutorial
Supplies
- Main fabric – ½ yard canvas, home dec weight fabric, or quilting cotton. (If you use quilting cotton you will need to also use interfacing.)
- Lining fabric – ½ yard quilting cotton
- Lightweight fusible interfacing (optional) – ½ yard, only necessary if using a quilting weight or lighter weight fabric for the main hat fabric
- Free pattern – Summer Bucket Hat
All seam allowances ¼”. RST = Right Sides Together
Prep
Cut the pattern pieces from your Main and Lining fabrics.
- On the Crown Top, cut small (1/8”) notches where indicated.
- While the Crown Side and Brim pieces are still folded in half, cut small notches at the top and bottom of the fold.
*Optional* Follow manufacturer’s instructions to apply interfacing to the back of the Main fabric pieces.
Sew the Main Hat
Place Crown Side pieces RST, then sew down both sides.

Press seam allowances open.
Place Brim pieces RST, then sew down short sides.

Press seam allowances open.
Pin top (shorter) edge of Crown Side to Crown Top, RST and matching at notches & side seams.

Sew the Crown Side to Crown Top. The curves of the pieces make this step seem weird. Just take it slow and ease the shapes together as you go.

Finger press the seam open, then finger press the seam allowance to the Crown Side. (If the curves seem wonky or out of shape, go back and clip the seam allowance to create a smoother curve.) Top stitch on the Crown Side 1/8” from the seam.

Now pin the top (shorter) edge of the Brim around the bottom of the Crown Side, RST and matching side seam and notches.

Sew the Brim to the Crown Side, easing the pieces together as you sew. This curve is not as tight as the previous one so it should be easier to sew.

Finger press seam open, then finger press the seam allowance to the Crown Side. (If the curves seem wonky or out of shape, go back and clip the seam allowance to create a smoother curve.) Top stitch on the Crown Side 1/8” from the seam.

Sew the Lining
Sew the Lining pieces together in the same way as the Main pieces.
Assemble the Bucket Hat
Now you have essentially two hats – a Main hat and a Lining hat. Let’s put them together to create your bucket hat.

Place the Main hat and Lining hat RST, matching side seams and notches. Sew around the outer edge, leaving 3” open to turn.

Clip curves, turn right side out then press. When you get to the turning hole, press the raw edges inward, even with the sewn edges. (I used a bit of gluestick to hold the raw edges in place.)
Top stitch around the outer edge of the Brim, close to the edge.

You’re almost done. All that’s left is creating the rows of stitching around the Brim.
Starting at the outside, sew concentric circles around the Brim. I used the edge of my presser foot as an easy stitch guide to create rows that are roughly 3/8” apart. Continue sewing circles until you fill the Brim.
Here it is after one row:

And after the Brim is filled with stitching.

There… NOW your bucket hat is finished!

1 comment
Comments are closed.
I made a hat for myself way back in the early 90's and when we were looking at our honeymoon photos just the other day I saw pics of me in it! I've not even thought to make one since but I love a bucket hat style (I'm a burn in 10 minutes kind of gal!) so you've inspired me. I love how a soft cloth hat can just fold up into a suitcase or bag so easily.