How I conquered the cords in my sewing studio
Between my sewing machines, serger, and iron, there are a LOT of power cords in my sewing room. Oh, and let's not forget the embroidery machine, the speakers for my iPhone, and my Silhouette machine. They all need to be plugged in to work. The result is a mess of power strips and extension cords strung in and around my sewing table and workspace. I had been thinking about getting an electrician like SALT (saltle.com/electrician-texas-service-areas/hutto-electrical-services/) out to see what could be done - be that installing new outlets or just anything to make things look a little less busy, but life got in the way of any progress being made on that particular front.


Yes, that's a cat sitting under the table.
A couple of weeks ago I spied this worktable at the Goodwill outlet.

(sorry for the blurry photo. I think my hand must have been shaking in excitement.)
Do you see those outlets? They're part of the table!! Oh my!!

No bending down and scrubbing around on the floor to plug and unplug my machines! No tangle of cords at my feet.
I almost came home with it, except my husband would have killed me. Besides that, I don't have room for an extra table in my sewing studio and I wasn't quite willing to give up the ones I already have. But I took a picture and showed to my husband, halfway hoping he'd have some brilliant idea for making space for the table.
He didn't.
But he did have another idea. You can buy super long power strips at the hardware store that you can mount to an existing table. All the power you want, wherever you want it.

This is the one we found at Harbor Freight for $24.99.

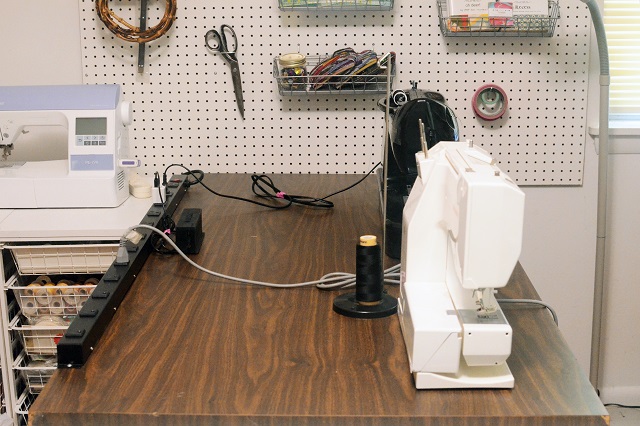
All we had to do was mount it to the back of my main sewing table. Now I've got tabletop plugs for both of my sewing machines!

It's not a perfect solution. The power cord for my serger doesn't reach so I'm still using an extension cord for that. I'm going to have to get used to my cords going across the sewing table, and to the back edge of the table now having a chunky power strip on it. Perhaps one day I'll get the electrical panel upgraded as, according to Barnett Electrical, that means there'll be more circuits available to split the load (whatever that means) - and maybe I could even have a few more outlets installed where I need them most.
I was able to tape the cords into loops to neaten things up. And look how neat things are in front of my sewing table!

That power strip is still there at the side, but it only has one cord going into it - and that's the one that powers the jumbo power strip. If I can find a closer outlet for it, or get someone like WireNut Home Services: electrician in Colorado Springs out to move an existing outlet closer, I can lose it altogether.
6 comments
Comments are closed.

Yeah, I'm totally at risk of breaking my leg in my studio because the only way to juice my lights and power tools is to run the cords across a walkway. Your solution is good.
Great idea! Before I head to Harbor Freight...what did he use to actually MOUNT the strip? I can't quite tell in the photo how it is attached. I've got a huge cutting table& could probably mount this underneath. Thanks for the clarification.
It was super easy to mount! There are a couple of holes - one at the top and one at the bottom - where you can just screw it in. There are also some holes on the back if you want it to be more secure. I don't remember exactly how those worked. I think they were keyhole slots? Unfortunately, it's all screwed down so I can't check. 🙂
After I plug my cords into a large power strip I use empty toilet paper rolls to stick the the access part of the cords in. So that they look better and last longer I wrap the toilet paper roll in colored mashing tape.
Oh that is so smart!! And I just happen to have a stash of empty toilet paper rolls! --Anne