Leather & Elastic Cuff Bracelets - TUTORIAL
I know y’all are thinking, “Does this Orange Bettie lady ever make anything besides bracelets?”
I do, I promise.
But after I made the scrap fabric bracelets, my mind just wouldn’t let go of the idea.
I have some scraps of the softest leather in the world, a gift from a friend of mine at work. It’s so soft and supple, I’ve had a hard time committing to using it. If I use it for a project, then I won’t have it for another project. The crafter’s dilemma.
But those fabric bracelets take just the smallest scraps, so I decided I could part with a few square inches to see what would happen if I gave it a go with the leather making something similar to Leathertreaty.com. I loved it so much, I made 6 more and that’s when I realized I needed a follow-up tutorial with the scrap fabric bracelet’s cousin, the Leather & Elastic Cuff Bracelet.

I used this project as an excuse to dig through my beads and jewelry supplies to embellish them.

Mostly I kept the embellishments pretty simple because I didn’t want to cover up too much of that leather. I used beads, and jewelry components, even crystal points.

If you want to make some of your own, read on to see how.
Materials:
- Leather scraps
- Fold over elastic
- Embellishments
- Gem-Tac adhesive (optional)
Here’s how to make them:
First, I cut a piece of leather 1” wide x 5” long. My leather is rather lightweight so I fused some jersey knit to the back to help stabilize it and keep it from stretching out of shape with repeated wears.
Then, I used a glue stick to glue a 7” piece of fold over elastic to each end of the bracelet. I glued the elastic to the underside with about ½” overlap. Then, I hit it with a warm iron for 2-3 seconds to dry the glue.
When I made the fabric bracelets, I had fun adding bright pops of color with the elastic. But on these leather bracelets, I chose elastic colors that blended with the leather.
Finally, I topstitched close to the edge around all sides of the bracelet. I stitched an extra line across the ends to better secure the elastic.
That’s all it takes to make the basic bracelet.
Now, to embellish!
There are about a million ways you can do this. Add as much or as little ornamentation as you like. I used Gem-Tac adhesive on all the beads and embellishments, though some I also followed up with stitching because I’m paranoid like that.
If you need some inspiration, here are the ones I made:
Vintage Lock and Key Embellishments

I found a set of vintage-inspired lock embellishments in the jewelry aisle at Michaels. I chose the one I liked the best and glued it down to the black leather bracelet.

Also from a set of vintage-inspired embellishments at Michaels. I glued the key but then also added some stitching to better secure it and because I liked the look of the stitches across the key.
Weird Green Blob Thing

If y ou’ve got a bin of broken jewelry parts, pull it out and see what you can find. This weird green blob thing made the perfect embellishment on a black bracelet!
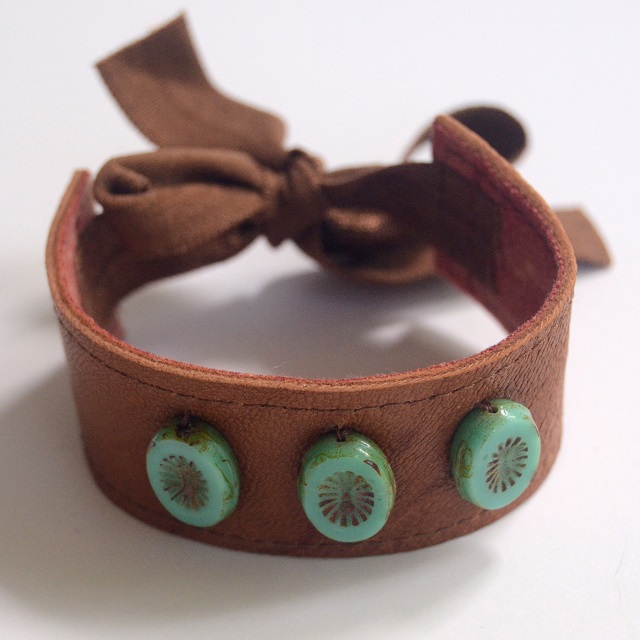
Three Beads

Three beads all in a row, how easy is that?

I glued them down but then also went back and secured them with stitches.
Leather Wrapped Crystal

I left this for last because it’s my favorite. I found these strings of double point crystals in the jewelry aisle at Michaels. I glued a strip of scrap leather around the middle of the crystal and then glued the wrapped crystal down to the bracelet.
I loved this style so much I made it twice. Ha!

There wasn’t a way for me to secure with stitching so I’m hoping the glue holds. The crystal isn’t so heavy but it is heavier than sequins and rhinestones, which is what is listed on the Gem-Tac bottle. So far, so good!


3 comments
Comments are closed.

Hi Annie love your bracelets Still waiting to try myself