Easter Chick Reversible Softie - Sewing Tutorial
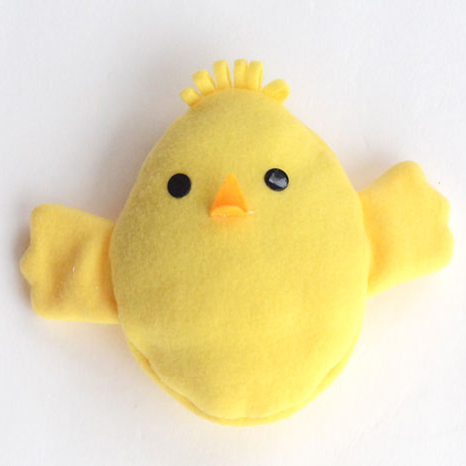
Create an Easter chick reversible softie with this free pattern! Turned one way, it's a chick. Turn it the other, and it's an egg. Kids will love it!
When I was a kid, one of my favorite dolls was a reversible Little Red Riding Hood doll. Held one way, it was Little Red Riding Hood, but turn her upside down and flip the skirt, and she was the grandmother. Flip the grandmother’s hat over and the doll became the wolf! I wasn’t captivated so much by the fairy tale as the doll that could be three characters.
Remembering how magic I thought a reversible softie was, I thought it would be fun to make a reversible softie for Easter. Keep reading for the tutorial and free pattern!

One side is an Easter egg, but reverse it through the envelope closure in the back and it becomes an Easter chick, with a felt beak and sweet little chickie wings!
Looking for more Easter sewing ideas? My soft fabric Easter eggs are quick and fun to sew up!
The large fleece egg would be so cute sitting in a child’s Easter basket, and imagine their surprise when they find out that it’s also a sweet little chick!

Egg, chickie…. Chickie, egg…

You might even find yourself asking - which came first, the chickie or the egg?
And when Easter is over, steal some of those eggs from your kids' baskets and use them to make a cute faux marquee chalkboard canvas! Get the DIY here.

My first attempts at the egg part of the reversible softie used a solid fleece that I embellished with ribbons. It was cute enough until I stuffed the softie, and then the ribbons acted like little girdles across the fleece egg and made it look sad and lumpy. My final version of the reversible softie skipped the ribbon embellishment and just used a printed fleece. It saved me some time and there were no lumpy edges!
Supplies
¼ yard yellow fleece (for chick)
¼ yard printed fleece (for egg)
Scrap orange felt
2 black plastic snaps (e.g. KAM snaps)
Polyfil stuffing
A little bit about the colors of the pattern pieces in the diagrams below: Gray indicates the right side of the patterned fleece. Yellow indicates the right side of the yellow fleece. White indicates the wrong side of the patterned and yellow fleece.
Sew the chick and egg backs
Place the two top back pieces right sides together. Sew along straight edge with 1/2” seam allowances.

Turn right side out.
Top stitch 3/8” from sewn edge.

Baste the layers together around curved edges with ¼” seam allowance.

Repeat these steps for the two bottom back pieces.
Place the egg front (patterned fleece) face up. Then, place the top back piece on it, patterned fleece side down. Then place the bottom back piece on top of that, patterned fleece side down. The top and bottom back pieces will overlap in the middle.

Baste the layers together around the outside with a ¼” seam allowance.

Create the chick face
Follow manufacturer’s instructions to place the black snaps at the spots marked on the placement guide the smooth (cap) side of the snap facing up. (The stud or socket side of the snaps should be on the back of the fleece.)

Place the beak on the chick front where indicated on the placement guide. Stitch a horizontal line across the middle of the beak to attach it to the fleece.

Fold the beak in half at the stitch line, at the same time folding the fleece to the back to get it out of the way.

Stitch across the beak again close to where it is attached to the fleece. This will give the beak dimension so it doesn’t lay flat on the chick’s face.
Place two of the wing pieces right sides together. Stitch around the curved edges with ¼” seam allowance. Clip curves and turn right side out.

Repeat with the remaining two wing pieces.
Place the wing pieces on the chick front where indicated by the placement guide. Baste in place with ¼” seam allowance.

Fold the Hair piece in half the short way. Snip into the folded side to create fringe roughly ¼” wide. (These lines are marked on the pattern piece.)

Baste the Hair raw edges together across the top of the chick front (yellow fleece) with a ¼” seam allowance.

Assemble the softie
Place the chick front on top of the layered back pieces, right sides together. (The chick piece will be face side down on to the layered back pieces, which will be yellow side up.)

Stitch around the outside with a ½” seam allowance, leaving 2 ½” inches open at the bottom.

Trim the seam allowances and clip curves, being careful not to clip all the way through the stitch line.
Turn right side out.
Stuff the reversible softie. Keep in mind that you’ll be reversing part of the cover back and forth over the softie body, so don’t stuff it as full as you would other softies.
Close the hole using a ladder stitch.


