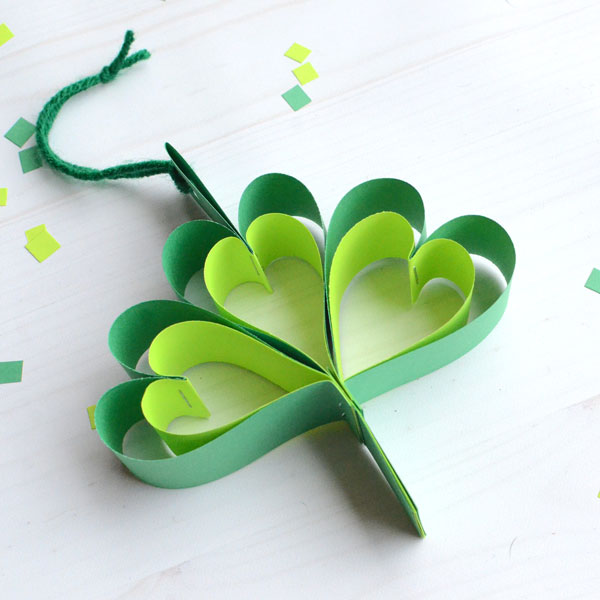
Easy Paper Shamrock – 3 Minute Craft Tutorial
This easy paper shamrock makes a fun St. Patrick's Day craft! You can make one in 3 minutes (or less) using my tutorial.
As you all may know, I work part time in the public library. One of the programs I do is a 3-Minute Craft, kind of a pop-up quick craft once a month. It’s fun to give kind of a “bonus” for coming in to the library, especially parents with kids. Get your books and make a craft while you’re there!
Since I’m already creating these crafts for the library, I thought it might be fun if I started turning them into tutorials as well.
I will admit that some of my library crafts take a tiny bit longer than 3 minutes, but I can say that they are all quick crafts that use inexpensive supplies.
A couple of weeks ago, I made a paper shamrock craft with folks who came into the library. I think they turned out pretty cute! The kids all loved them and felt pretty proud at what they made.

They’re easy to make and require only colored copier-weight paper, some paper clips, and a stapler. Oh, and also a little bit of yarn to hang them.
Colored copier weight paper is a bit easier to find around an office setting than around your house. I haven’t tried using cardstock instead, but I have a feeling it may be too thick for the stapler. But I’m betting you could buy some individual sheets of copier weight colored paper at a copy shop. A few pieces of each color would generally be enough to make a whole garland.

These were easy enough for kids to do, though I did have to help them with one step. Though once kids see how it’s put together, I think older kids could totally manage that step. I loved watching their brains click when they saw how the layered rectangles of paper became the curved leaves of the shamrock!

How to Make an Easy Paper Shamrock
Materials
Dark green paper
- 3 strips 1” x 8.5”
- 3 strips 1” x 3.5”
Light green paper
- 3 strips 1” x 6.5”
- 2 strips 1” x 3.5”
3 paper clips
Hole punch
Yarn
Stapler
Start by folding all three of the 8.5” (dark green) and 6.5” (light green) strips in half.

Then layer a folded dark green strip inside a folded light green strip.

Staple the folded units close to the folded edge.

Bend the light green layers all the way around so their edges meet. Be careful not to crease anything - just bend the paper back to create a heart shape.

Now, bend the dark green layers around the same way, with the all of the edges meeting even at the bottom. This creates a double heart shape.

Put a paper clip around the strips to hold them in place, then slide the paper clip up so it’s about an inch from the bottom.

Now, repeat all of that to make a second paper clipped heart.
Those two paper clipped hearts will the left and right “leaves” of the shamrock. For the middle “leaf” we’ll need to add an extra step to make a little hanger.
Take one of the dark green 3.5” strips and fold it in half, then punch a hole close to the folded edge.

Take the remaining folded unit and add that punched piece to the middle of the dark green strip, with the folded edge facing OUT. The ends of the punched piece should be right up next to the fold.
Staple the unit together close to the folded edge.
Now go ahead and bend the light and dark green strips back and paper clip, just as you did with the other units. You’ll see that there’s a little hanger peeking out the middle.

Fold those last two 3.5” strips in half.

Place the folded light green strip inside the folded dark green strip.

Now to put it all together! Pick up the three paper clipped heart units and hold them together with the bottoms aligned. The one with the hanger should be in the middle.

Then, while holding all of these pieces together, slide those short folded unit up in to the stack of strips. Make sure there’s about ¾” overlap.

Carefully slide all of this under the stapler, then staple together at the overlap.

You’ve got your basic shamrock now, though right now it looks a bit more like a stalk of broccoli.

Remove the paper clips. Then bend the leaves apart just above the staple, with a slight crease to help it hold its shape.

Last, loop some yarn through the hanger at the top. Your paper shamrock is done!

I used a lot of words to describe it, but it really is a fast little project. You could easily make enough to fill a window or create a garland!


