

Patchwork Pocket Wristlet Zipper Pouch Tutorial
Keep your phone and essentials handy with this patchwork pocket wristlet pouch! Use my zipper pouch tutorial to sew a pocket wristlet pouch with removable strap.
This post contains affiliate links. If you purchase something through one of those links, you won’t pay a penny more, but I’ll earn a small commission which will help me keep bringing great content to you. Thanks!
This post originally appeared on Bombshell Bling.
I’m a sucker for tiny things and of course fabric, so whenever I see a pack of mini charm squares I grab them up. What are mini charm squares, you ask? They’re like charm squares (pre-cut fabric squares), but tiny. Regular charm squares are 5”, but mini charm squares are 2.5”. They’re just adorable.
I recently picked up a pack of mini charm squares from my local quilt shop, and I’ve been working my way through the stack of squares. You’d be surprised how many projects you can make from just one pack of mini charm squares!

One of my favorite things I’ve made with them is this wristlet zip pouch. There’s a patchwork pocket on front that’s made from the mini charm squares. I also used the mini charms to make a removable wristlet strap. Read on for the zipper pouch tutorial!

If you like making zipper pouches, you may also like my curve top mini zip pouch tutorial, or maybe my curve top cosmetic bag zipper pouch tutorial.
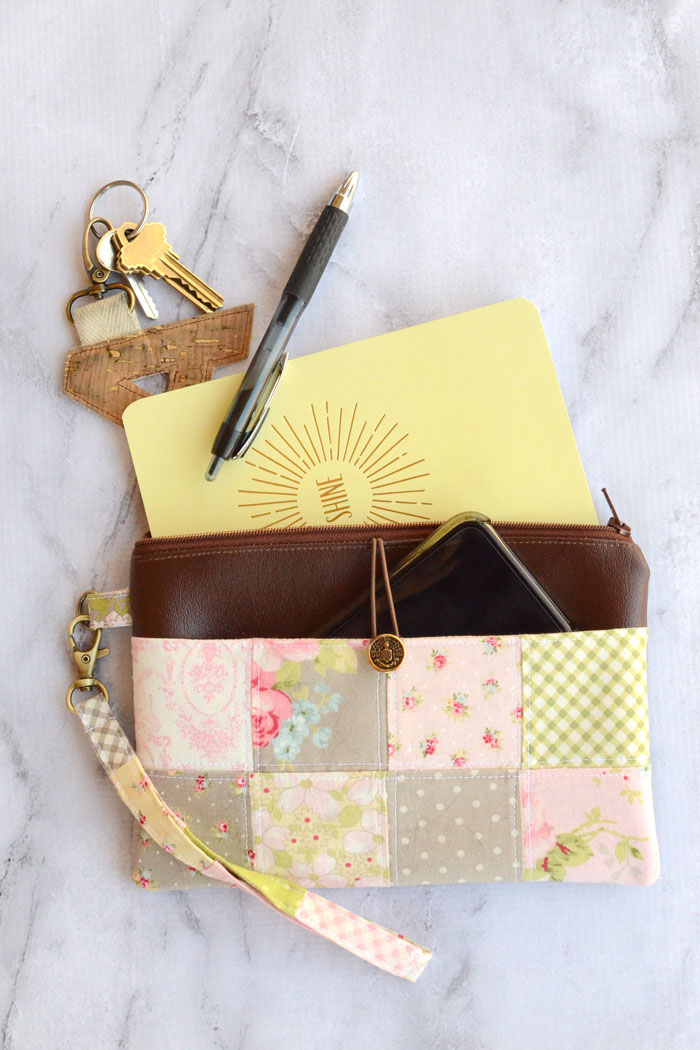
I paired the sweet prints of the patchwork with a rich walnut faux leather. I like the contrast of texture and color! The bag itself is roughly 8.5” wide x 5.5” tall, with a zipper closure and a patchwork pocket all the way across the front. The pocket is the perfect size to hold a phone or a small notebook. An elastic loop and button will help keep your stuff inside the pocket.

An optional wristlet strap makes it easy to carry the bag. I made the strap from a patchwork of charm squares, but you could use a solid fabric if you like.
Between the patchwork and the wristlet strap, I used a total of 16 mini charm squares for this project, which leaves plenty of those little squares left in the pack for other projects! If you don’t have a mini charm pack, it’s easy enough to cut some scraps into 2.5” squares for this project.

Patchwork Pocket Wristlet Zipper Pouch Tutorial
Supplies
8 2.5” fabric squares (for patchwork pocket)
Faux leather – 2 pieces 6” x 8.5”
Lining fabric – 2 pieces 6” x 8.5” (bag lining) and 1 piece 4.5” x 8.5” (pocket lining)
Fusible fleece – 1 piece 4” x 8” (affiliate link)
Zipper at least 9” long (affiliate link)
1/2" swivel hook (affiliate link)
1/2" D-ring
5” elastic cord (I used a hair elastic that I cut apart.)
Button
Tips and tricks for best results:
For best results when sewing on faux leather, use a leather needle and a Teflon presser foot. If you don’t have a Teflon presser foot, you can cover the bottom of your presser foot with tape. This will keep the faux leather from sticking to the bottom of the presser foot.
Pins create permanent holes in faux leather, so use fabric clips instead of pins to hold the faux leather in place.
For optional removable wristlet strap:
7 2.5” fabric squares (for patchwork strap) OR 1 piece 2” x 14” (for solid strap)
1 2” x 2” fabric square (I trimmed down a mini charm square.)
½” D-ring
½” swivel hook (affiliate link)
All seam allowances ¼”, unless otherwise noted. RST = right sides together.
(Optional) Make the wristlet strap and anchor piece:
If you are making a patchwork strap, piece the squares together end to end. Then, trim the patchwork piece to 2” x 14”. If you’re making your strap from a single piece of fabric you can just skip to the next step.
Press in half lengthwise, then press raw edges to center.

Press in half lengthwise again to make a ½” wide strap.

Thread the swivel hook on to the strap.

Being careful not to twist the strap, open out the ends and place them RST. Sew across the ends to join them.

Press the seam allowance open and then refold the strap along original crease lines. You now have a fabric loop with a swivel hook on it.

Top stitch down both sides, moving swivel hook out of the way as your progress around the loop.

Fold the strap at the swivel hook. Stitch across the strap ½” from swivel hook to secure.

The wristlet strap is done! Now, let’s make the anchor piece.
Take your 2” x 2” piece of fabric. Just as you did with the wristlet strap, press the square in half, then press the raw edges to the center. Press in half again to make a ½” strap.
Top stitch down both sides of the strap close to the edge.
Make the patchwork pocket:
Piece the 8 2.5” squares together in 2 rows of 4 squares, to make a patchwork rectangle 4.5” x 8.5”.

Follow manufacturer’s instructions to fuse the fusible fleece to the back of the patchwork rectangle.

Optional: Quilt the patchwork rectangle. I quilted straight lines 1/8” on either side of each seam.

Place the pocket lining on top of the patchwork rectangle, RST.
Sew along top with ¼” seam allowance.

Turn right side out. Press.
Top stitch along top, close to the edge.

Make the bag front:
Place the pocket across the bottom of the bag front, raw edges aligned. Baste in place along sides and bottom with a 1/8” seam allowance. DO NOT PIN IN PLACE. Pins will create holes in your faux leather. Use fabric clips instead.

If you are making the optional removable wristlet strap, you’ll need to add the anchor piece to the bag front now. Thread the D-ring on to the anchor piece, then fold the anchor piece in half.

Place the anchor piece to the edge of the bag front, roughly ¼” above the top of the pocket, RST and with raw edge aligned. The D-ring will be facing inside the bag. Baste in place with a 1/8” seam allowance.

Fold the elastic cord in half and place it at the middle of the top of the bag, with raw edges aligned. The loop will be facing the bottom of the bag. Baste in place with a 1/8” seam allowance. I usually stitch over the elastic a couple of times to make sure it’s good and secure.

Assemble the bag:
Start by making a sandwich with your zipper, your bag front, and one of the bag lining pieces. Place the lining piece right side up, then the zipper right side up, and finally the bag front right side down – with raw edges touching.
Stitch the layers together, using a zipper foot to stitch close to the zipper.

It’s okay if your zipper is longer than the fabric pieces. Just sew it in and let the extra zipper hang off the edge; we’ll trim it later.
Turn right side out and press with a low heat iron on the lining side. Be careful not to overheat or let the hot iron touch your faux leather, as it will make it warp or melt. Top stitch close to the zipper.

Repeat with the remaining lining piece and the bag back, sewing them to the other side of the zipper.

UNZIP THE ZIPPER. This is super important. I feel like I should write it in blinking text or something. ? You’ll need the zipper open so you can turn the bag right side out at the end. ALSO IMPORTANT: If your zipper extends past the edge of your bag, make sure the zipper pull isn’t pulled out past the end of the bag.
Open up the bag and flatten it so the outside pieces are right sides together and the lining pieces are right sides together. Mush the extra fabric at the zipper tabs toward the lining.
Sew down the sides and across the bottom with a ¼” seam allowance, leaving 3.5” along the bottom of the lining to turn it.

Clip corners. Trim the zipper ends to make them even with the bag.
To get neater corners by the zipper, make a small clip into the seam allowance on the faux leather just past the bulk from the zipper.
Turn the bag right side out. Use a ladder stitch to sew the hole closed.
Hand sew a button to the patchwork pocket.
Attach your wristlet strap to bag.
Your patchwork pocket wristlet pouch is DONE!
Load it up with your keys, wallet, and phone and you’re ready to go!


1 comment
Comments are closed.