
Patchwork Pillow Wrap with Mini String Quilt Blocks - Tutorial
See how to use your smallest fabric scraps to create a beautiful patchwork pillow wrap! I’ve got a tutorial showing you how to sew a patchwork pillow wrap from mini charm squares or mini string quilt blocks. P
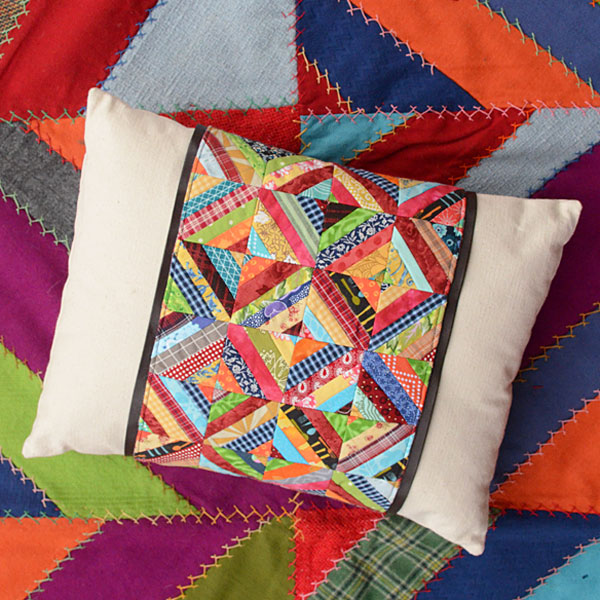
Y’all know how much I love fabric scraps, right? Even the teeny tiny ones. Maybe especially the teeny tiny ones. This patchwork pillow wrap uses those small scraps to create a pretty accent pillow.

The great thing about a pillow wrap is that it’s so easy to switch it out for seasons – or just your whim. You can create a whole new look for a pillow simply by removing or switching the wrap.

I’ve already created pillow wraps for different holidays – a pumpkin for fall, a snowman for winter, and a heart for Valentine’s Day. This patchwork pillow wrap isn’t holiday or season specific so it can work all year long.
The patchwork on this wrap uses some of my mini string quilt blocks sewn from my smallest scraps. And while I do enjoy tiny patchwork, it can take a LOT of piecing to cover a space. It was super satisfying sewing my scraps into those tiny blocks, but you could also skip all of that and use mini charm squares instead.
Another benefit of the pillow wrap is getting all the joy of a patchwork pillow, but with far fewer blocks than if you were covering the whole thing. This pillow wrap takes only 24 2.5” blocks.

Pillow wrap fits a 12” x 16” accent pillow. You can get the tutorial to make a pillow that size here.
Supplies
24 2.5” mini string quilt blocks (tutorial here) or mini charm squares
Top/Bottom Panels – 2 pieces 8.5” wide x 8.25” tall from quilting cotton
Lining – 1 piece 8.5” wide x 28” long from quilting cotton
Fusible Fleece – 1 piece 8” wide x 27.5” long
Hook and look tape – 1 piece, 8” long
Trim (optional) – 2 pieces, 28” long

RST = Right Sides Together. All seam allowances ¼” unless otherwise stated.
Sew the Patchwork Panel
First, place your 2.5” squares in a rectangle that’s 4 squares wide and 6 squares tall. Play around with the placement of the different squares to get an arrangement of color & pattern that you like. Keep in mind that the middle 4 rows will be the ones most visible on the finished pillow wrap.
Once you get your squares arranged, it’s a good idea to take a quick photo on your phone. That way, even if your squares get all mixed up you’ve got a photo to refer to when sewing your blocks together.
Now take the first two pieces on the first row and place them RST. Sew together with a ¼” seam allowance.

Between stacking the squares together and taking them to the machine, it’s easy to lose track of which side needs to be sewn together. Ask me how I know. So now as soon as I place the squares RST, I use a fabric clip or straight pin to mark the side to sew.
Press the seam and seam allowances open.


Continue sewing squares together until you’ve sewn the whole row.

Repeat with the next 5 rows.

Now, sew those rows together, being careful to match the seams where the blocks were sewn together. You’ll probably have a few that don’t match up perfectly. That’s okay. Some of mine didn’t match up perfectly and I think my patchwork still looks nice overall.

When you get done, you’ll have a pretty Patchwork Panel.
Sew the Wrap Front
Place the Top Panel across top of the Patchwork Panel, RST. Sew across the top.

Press open.

Place the Bottom Panel across the bottom of the Patchwork Panel, RST. Sew across the bottom.

Press open.

Follow manufacturer’s instructions to fuse the fusible fleece to the back of the Wrap Front.

Assemble the Pillow Wrap
*optional* Baste trim down both long edges of the Pillow Wrap Front, RST and raw edges aligned, using a 1/8” seam allowance. The trim should be facing the inside of the wrap.

You can also wait until the pillow wrap is finished to add the trim, though you would need to attaching it using fabric glue in order to avoid an extra stitch line showing.
Place the Pillow Wrap Front and Lining RST. Sew around all 4 sides leaving 3” open to turn.

Clip corners. Turn right side out. Press.
Press seam allowances to the inside at the turning hold. Top stitch all the way around the Pillow Wrap. This will close the hole.

Sew the “hook” side (the scratchy side) of the tape across the top of the Wrap Lining (the back of the wrap), centered horizontally and about ½” from the top edge. Stitch around all 4 sides of the hook tape so it’s good and secure.

Now sew the “loop” side (the soft, fuzzy side) of the tape to the bottom of the Wrap Front.
You’ll need to place the Pillow Wrap around the Pillow so you can see how far up from the bottom it needs to be in order to connect with the hook tape. I placed my loop tape about 1.5” from the bottom of the wrap, but it may be different for you depending on how fully your pillow is stuffed.
As before, stitch around all 4 sides of the tape to secure it.

Your Patchwork Pillow Wrap is finished!
1 comment
Comments are closed.